Architecting a Live Agent with LiveKit. My findings for a basic RAG arcthitecture.
I recently started experimenting with building live conversational agents for building an AI assistant type of product.
I started by exploring the Google ADK with websockets. To be clear: you can absolutely build robust products on that stack. However, I found myself spending 80% of my time handling the low-level plumbing—silence detection, interruption handling, and state management—and only 20% on the actual product logic.
I wanted a higher level of abstraction, so I shifted my experiments to LiveKit. Here is the architecture I’ve settled on to connect a mobile frontend to a Pythonic brain.
The Architecture Overview
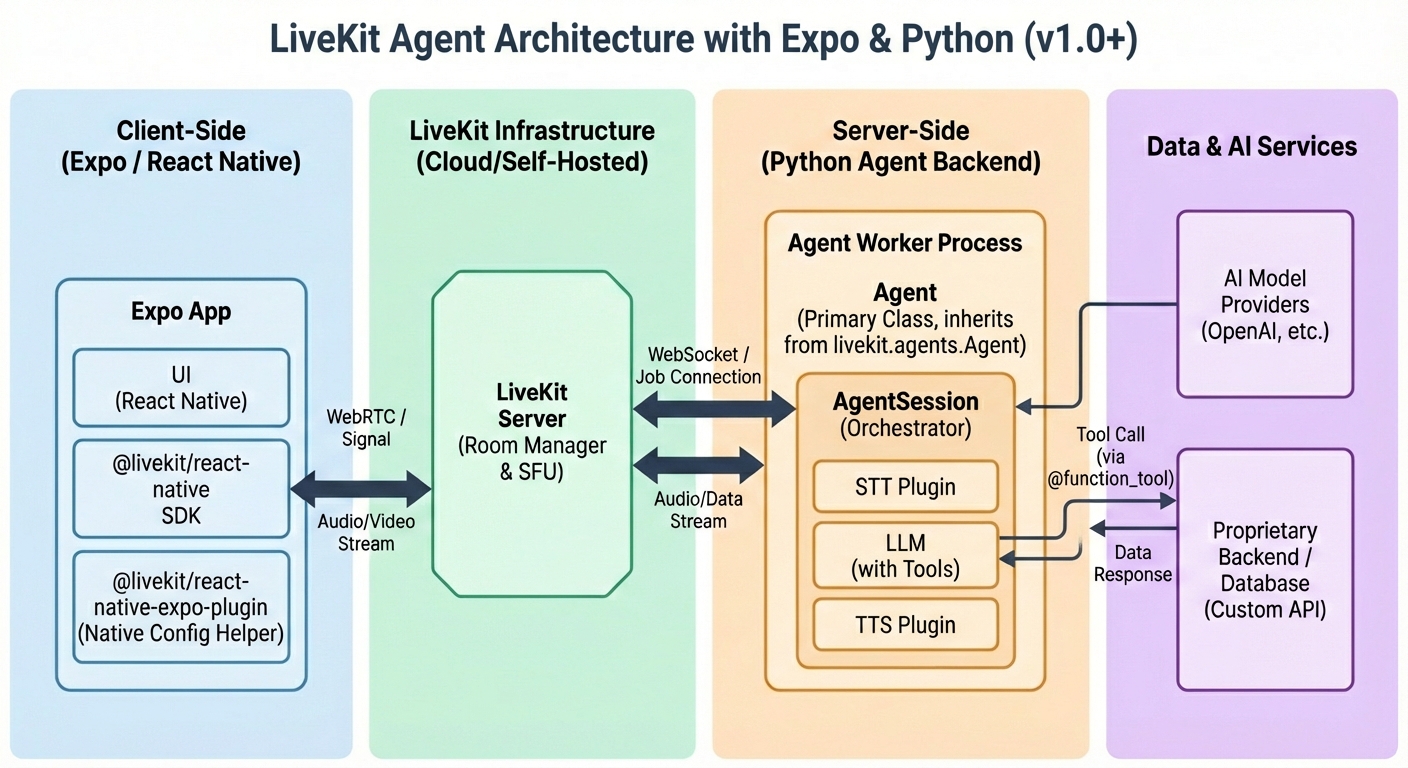
The system splits into three distinct parts:
- Frontend (Expo): Connects to the room (Microphone/Speaker).
- Call routing (LiveKit Server) Provides the routing for users and agents to joing a room.
- Backend (Python): Runs the Agent loop (Hearing → Thinking → Speaking).
- Data (Tools): Proprietary data injected via Function Calling.
The Flow
Here’s a simplified version of the flow:
- You start your LiveKit Server
- You start your Agent Server. The Agent Server opens an outbound WebSocket connection to the LiveKit Server. It sends a signal: “I am available to handle jobs.”
- A user opens your Expo app and connects to the LiveKit Server.
- The LiveKit Server sees the user and sends a message to your Agent Server via that open WebSocket: “User X just joined Room Y. Please handle it.”
- Your Agent Server spins up a new process, joins Room Y, and begins the conversation.
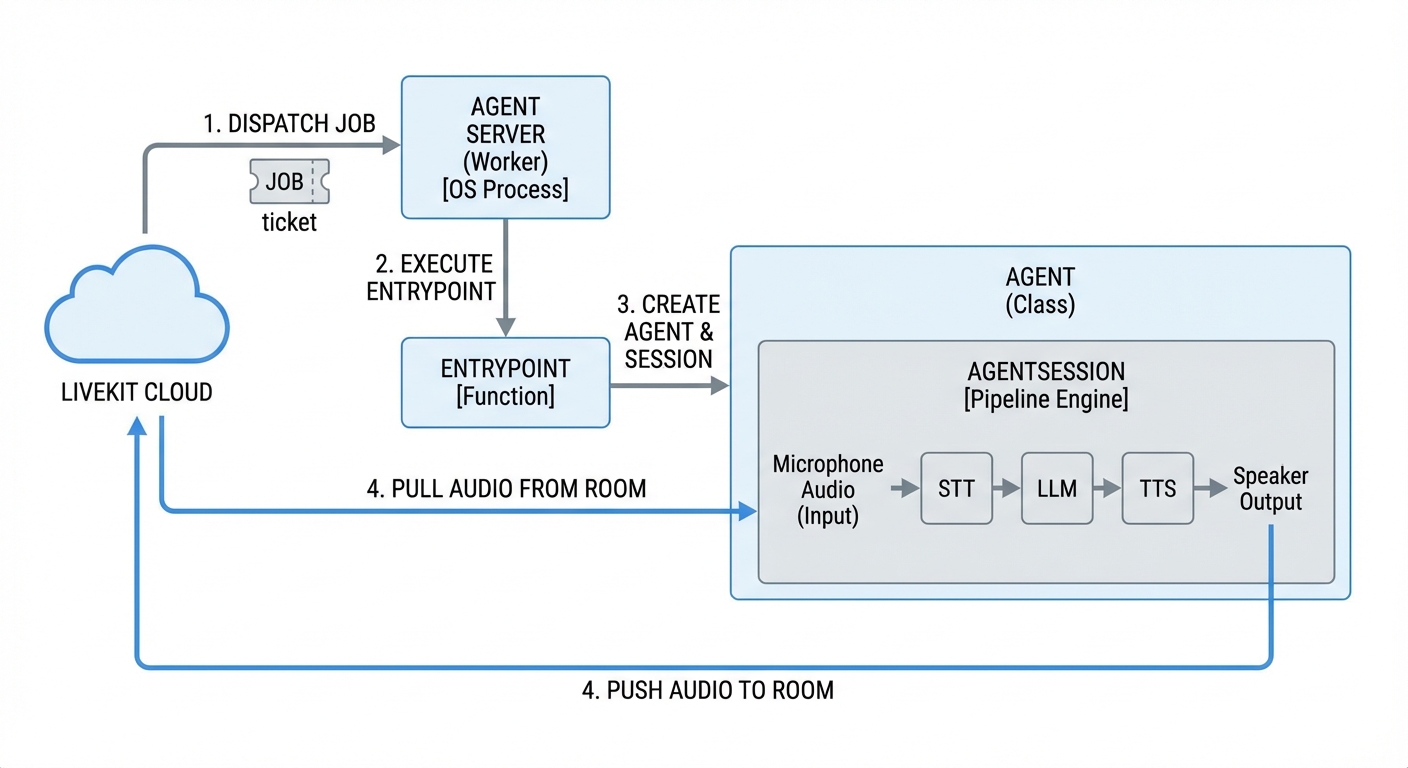
Here is exactly how they interact in a real scenario, typically occurring in milliseconds:
- START: You run
python agent.py. The Agent Server (Worker) starts up and idles. - TRIGGER: A User joins a room in your Expo app.
- DISPATCH: LiveKit Cloud sees the user and sends a Job to your idle Worker.
- EXECUTION: Your Worker accepts the Job and runs the Entrypoint function.
- CREATION:
- The Entrypoint instantiates your Agent class (The Identity).
- The Agent instantiates an AgentSession (The Brain).
- CONNECTION: The AgentSession connects to the Room defined in the Job.
- LOOP: The AgentSession now continuously pulls audio from the Room, processes it, and pushes audio back.
1. The Frontend: Handling the WebRTC layer
If you are using React Native (Expo), standard WebRTC support can be flaky. You usually need native modules to handle the streams reliably.
I used @livekit/react-native alongside the @livekit/react-native-expo-plugin. This plugin handles the native config automatically, so you don’t have to write native iOS/Android code.
The frontend is intentionally “dumb.” It doesn’t handle AI logic; it just joins the room.
1
2
3
4
5
import { useRoom } from '@livekit/react-native';

// The client simply connects. The Backend Agent handles the logic.
const room = useRoom();
await room.connect(url, token);
2. The LiveKit Server (The “Router”)
The LiveKit Server sees the user and sends a message to your Agent Server via that open WebSocket: “User X just joined Room Y. Please handle it.”
- Role: It is a Signal & Media Bridge (SFU).
- Job: It receives video/audio packets from a user’s phone and instantly forwards them to other people (or agents).
- Intelligence: It has zero intelligence. It does not know what is being said. It just routes data packets from Point A to Point B.
- Protocol: It speaks WebRTC.
3. The Agent Server Backend (The “Brain”)
On the server side, we use the livekit-agents library. This abstracts the async buffering required to stitch audio streams with AI models.
To understand the system at a high level, you should focus on the distinction between the Agent Server (the persistent process) and the Job (the individual session for a room).
- Agent Server: This is the long-running worker that registers with LiveKit. It doesn’t participate in a room itself; it manages the resources and “spawns” agents. When you run the command
python agent.py, that running process becomes the Agent Server. Its only job is to stay alive, connect to the LiveKit infrastructure, and wait for work. - Job: When a user joins a room, the LiveKit server dispatches a “Job” to your Agent Server. The server then executes your
entrypointfunction in a new worker process.
There are two main components:
- The Agent: The worker process that joins the room.
- The AgentSession: The pipeline orchestrator.
The two layers of the Agent Server
Here is the hierarchy from the “Outside” (OS level) to the “Inside” (Logic level).
Layer 1: The Infrastructure (The Container)
- Agent Server (Worker):
- What it is: The physical running process (
python agent.py). - Role: It connects to LiveKit Cloud and waits. It has no active rooms yet. It is just a “listener” saying, “I am ready to accept work.”
- What it is: The physical running process (
- Job:
- What it is: The signal/ticket from the server.
- Role: When a user joins a room, LiveKit sends a Job to your Worker. The Job contains the specific
RoomIDandToken.
Layer 2: The Code (The Logic)
- The Entrypoint:
- What it is: A specific function in your code that triggers when a Job arrives.
- The “Stitch” Point: This is where Layer 1 meets Layer 2. The Worker executes this function for that specific Job.
- The Agent (Class):
- What it is: The “Identity” of your bot.
- Role: It holds the personality (instructions) and lifecycle events (like
on_connect).
- The AgentSession (The Engine):
- What it is: The “Brain” or “Pipeline.”
- Role: This object sits inside the Agent. It physically manages the data flow:
Microphone Audio->STT->LLM->TTS->Speaker Output.
3. Context & Proprietary Data
The biggest challenge with standard LLMs is that they don’t know your business data.
To solve this, we use Function Calling (Tools). We don’t force the LLM to memorize data; we give it a Python function to query the database when needed.
Here is the implementation pattern:
1
2
3
4
5
6
7
8
9
10
11
12
13
14
15
16
17
18
19
20
21
22
23
24
25
26
27
28
29
from livekit.agents import Agent, AgentSession, JobContext, Worker, cli, function_tool
from livekit.plugins import openai, deepgram

# 1. Define the Tool
# The docstring is critical; the LLM reads it to know WHEN to call this.
@function_tool
async def get_user_account_status(user_id: str):
    """
    Retrieves the account status and balance for a specific user.
    """
    # Query your DB here
    return {"status": "active", "balance": "$45.00"}

class MyAssistant(Agent):
    async def on_connect(self, ctx: JobContext):
        # 2. Create the Session
        session = AgentSession(
            ctx,
            llm=openai.LLM(model="gpt-4o"),
            stt=deepgram.STT(),
            tts=openai.TTS(),
        )

        # 3. Register the Tool
        session.llm.tools.register(get_user_account_status)
        session.start()

if __name__ == "__main__":
    cli.run_app(Worker(MyAssistant))
Detailed architecture
Now that we’ve laid out the components, logic and workflows we can paint a more detailed architecture of the system: 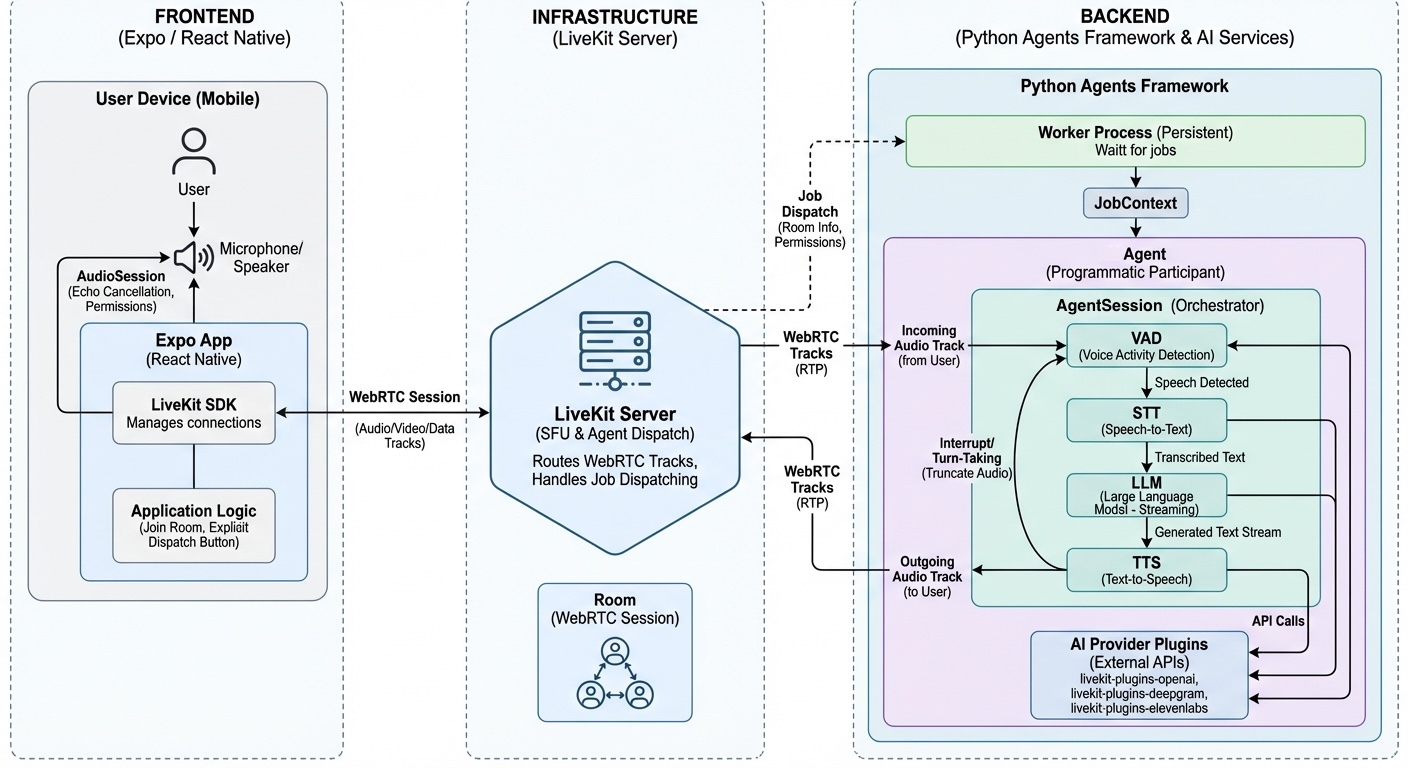
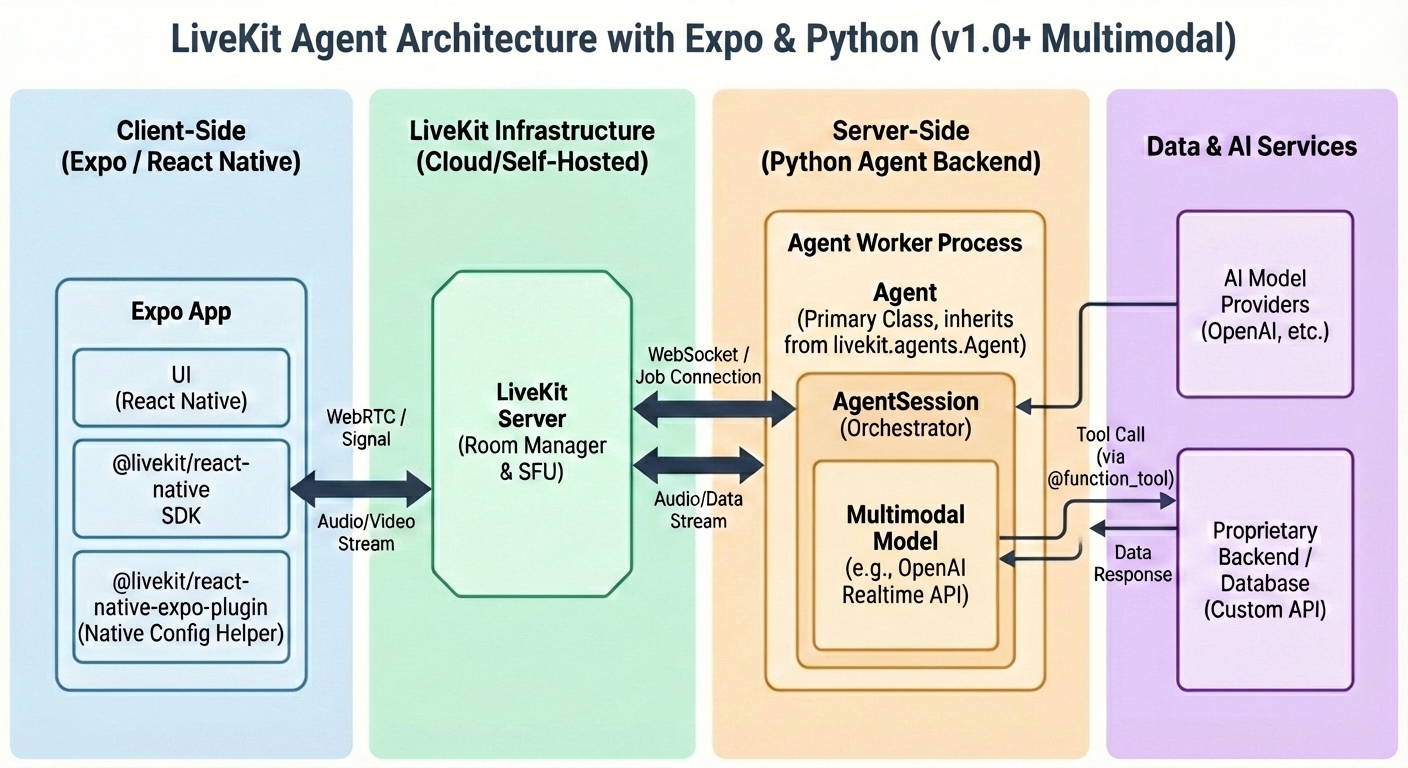
In the presented architectures we are assuming a pipeline orchestrated by the AgentSession component (STT -> LLM -> TTS) however many providers have been releasing their all-in-one realtime models (and APIs) that promise to do all of this. With the pipeline option you can choose the best tools for the job, specialized tools for SST and TTS and the fastest (and more accurate) model, but the convenience of having to deal with one single PoF is big. In that case the architecture is a bit more simplified:
The Realtime Architecture (v1.0+)
The architectural shift when using OpenAI/Gemini/Etc Realtime API (audio-to-audio) instead of the traditional STT → LLM → TTS pipeline.
Major Update (v1.0 Standard): Previously, LiveKit had a separate class called MultimodalAgent. This is now deprecated. In the current v1.0 architecture, you still use AgentSession, but you configure it differently. The AgentSession is smart enough to detect that you are using a “Realtime Model” and automatically collapses the pipeline.
1. The Architectural Shift: “Chain” vs. “Tunnel”
Standard Pipeline (The “Chain”)
- Structure: Modular blocks.
- Flow: The
AgentSessionacts as a traffic controller. It uses a local VAD (Voice Activity Detector) to detect silence, cuts the audio, sends it to STT, waits for text, sends to LLM, waits for text, sends to TTS, plays audio. - Latency: Cumulative (STT + LLM + TTS).
Realtime Model (The “Tunnel”)
- Structure: A single, continuous stream.
- Flow: The
AgentSessionopens a WebSocket tunnel directly to the Model (e.g., GPT-4o Realtime). - Audio Handling: It streams raw audio bytes directly to the model. The model processes the audio and streams raw audio bytes back.
- Latency: Ultra-low (because the model starts “speaking” before it even finishes “thinking”).
2. Code Comparison (How it looks)
You use the same AgentSession, but you remove the STT and TTS modules and swap the LLM.
Standard Pipeline:
1
2
3
4
5
6
session = AgentSession(
    ctx,
    stt=deepgram.STT(),       # Distinct Component
    llm=openai.LLM(),         # Distinct Component
    tts=elevenlabs.TTS()      # Distinct Component
)
Realtime Architecture:
1
2
3
4
5
6
7
8
9
10
11
from livekit.plugins import openai

session = AgentSession(
    ctx,
    # The "RealtimeModel" handles hearing AND speaking
    llm=openai.realtime.RealtimeModel(
        instructions="You are a helpful assistant",
        voice="alloy",
    )
    # Note: No STT or TTS arguments are needed (usually)
)
3. The New Flow Interaction (The “Realtime Loop”)
Because the distinct steps are gone, the feedback loop changes slightly.
- Actors:
- User (Expo App): Speaks into microphone.
- AgentSession: Acts as the bridge.
- OpenAI Realtime (Cloud): The “Black Box” that hears and speaks.
The Loop Steps:
- Stream Up:
AgentSessioncontinuously pushes Microphone Audio into theRealtimeModel. - Server VAD: The
RealtimeModel(on OpenAI’s server) listens. When it hears speech, it triggers a “turn.” - Inference: The model processes audio tokens directly into audio tokens (Thinking).
- Stream Down: The model streams Audio Bytes back to the
AgentSession. - Playback:
AgentSessionpushes those bytes immediately to the Speaker Output.
4. How Proprietary Data Works (Realtime RAG)
You might wonder: “If it’s audio-in/audio-out, how do I inject my database data?”
The Realtime API still supports Function Calling (Tools), but the flow is an interruption pattern:
- User: “What is my account balance?” (Audio)
- Model: Recognizes the intent -> Pauses Audio Generation -> Sends a text signal:
call_function("get_balance"). - AgentSession: Intercepts the signal -> Runs your Python function (queries DB).
- AgentSession: Sends the result (
$45.00) back to the Model. - Model: Resumes Audio Generation -> “Your balance is 45 dollars.” (Audio)
5. Visual Hierarchy Update
Here is how the internal AgentSession diagram simplifies:
OLD (Pipeline): Mic -> [VAD -> STT -> LLM -> TTS] -> Speaker
NEW (Realtime): Mic -> [ RealtimeModel ] -> Speaker
6. The Architecture (Realtime RAG)
- The Model:
OpenAI Realtime(Handles Audio Input -> Audio Output). - The Orchestrator:
AgentSession(Manages the connection). - The Bridge:
fnc_ctx(Exposes your Python function to the Model).
File: agent.py
1
2
3
4
5
6
7
8
9
10
11
12
13
14
15
16
17
18
19
20
21
22
23
24
25
26
27
28
29
30
31
32
33
34
35
36
37
38
39
40
41
42
43
44
45
46
47
48
49
50
import asyncio
from livekit.agents import (
    AutoSubscribe,
    JobContext,
    Worker,
    cli,
    llm
)
from livekit.agents.llm import FunctionContext, ai_callable
from livekit.plugins import openai

# --- 1. DEFINE YOUR TOOLS ---
# This class acts as the "Menu" of functions the AI can order from.
class AssistantFnc(FunctionContext):

    @ai_callable(description="Get the current account balance for a user ID.")
    async def get_balance(self, user_id: str):
        # In a real app, you would query your DB here.
        # We just return a string. The AI will read this string and speak it.
        print(f"🤖 (Tool Called) Fetching balance for: {user_id}")
        return f"The balance for user {user_id} is $4,500.00"

# --- 2. CONFIGURE THE AGENT ---
async def entrypoint(ctx: JobContext):
    # Connect to the room (Audio Only)
    await ctx.connect(auto_subscribe=AutoSubscribe.AUDIO_ONLY)

    # A. Configure the Realtime Model
    # "fnc_ctx" isn't passed here directly in v1.0, it's passed to the Session
    model = openai.realtime.RealtimeModel(
        instructions="You are a helpful assistant. Use tools when asked for data.",
        voice="alloy",
    )

    # B. Create the Unified Session (The Tunnel)
    # The 'fnc_ctx' argument is what bridges your Python code to the Model
    session = llm.AgentSession(
        ctx,
        llm=model,
        fnc_ctx=AssistantFnc()
    )

    # C. Start the "Tunnel"
    session.start()

    # D. Keep the process alive
    await asyncio.sleep(1000000)

if __name__ == "__main__":
    cli.run_app(Worker(entrypoint))
How this works in practice:
- User says: “What is the balance for user 123?”
- OpenAI Model: Hears the intent -> Pauses speaking -> Sends signal
call_function("get_balance", "123"). - AgentSession: Catches signal -> Runs your Python function
get_balance. - AgentSession: Sends result “The balance for user 123 is $4,500.00” back to OpenAI.
- OpenAI Model: Resumes speaking -> “I checked for you. The balance for user 123 is four thousand five hundred dollars.”
Implementation details
AssistantFncis the Class (The Blueprint).AssistantFnc()<— The parentheses mean “Create an object of this class.”FunctionContextis the base class is designed to be a Registry. When you instantiate it’s subclass (AssistantFnc()), it automatically scans itself to find every method decorated with@ai_callableand packages them up for the LLM.
How to pass Multiple Tools
You do not need to create multiple context objects. You simply add more methods inside that one class.
The AgentSession will accept the single fnc_ctx object, which contains all your tools.
Code Example: Multiple Tools (Balance + Transactions)
1
2
3
4
5
6
7
8
9
10
11
12
13
14
15
16
17
18
19
20
21
22
23
24
25
26
27
28
29
30
from livekit.agents.llm import FunctionContext, ai_callable

class AssistantFnc(FunctionContext):

    # --- TOOL 1 ---
    @ai_callable(description="Get the current account balance for a user ID.")
    async def get_balance(self, user_id: str):
        print(f"🤖 Checking balance for {user_id}")
        return f"Balance: $4,500.00"

    # --- TOOL 2 (Just add another method!) ---
    @ai_callable(description="Get the last 3 transactions for a user ID.")
    async def get_transactions(self, user_id: str):
        print(f"🤖 Checking transactions for {user_id}")
        # Logic to fetch from DB...
        return "1. Netflix -$15.00, 2. Uber -$25.00, 3. Salary +$3000.00"

    # --- TOOL 3 ---
    @ai_callable(description="Lock the user's card.")
    async def lock_card(self, user_id: str):
        print(f"🤖 Locking card for {user_id}")
        return "Card ending in 8899 has been locked."

# --- USAGE ---
# You still pass just the ONE object. It contains all 3 tools.
session = llm.AgentSession(
    ctx,
    llm=model,
    fnc_ctx=AssistantFnc() # <--- This object now holds 3 tools
)
Why this design? (The “Context” Concept)
They call it FunctionContext (instead of just “Tools List”) because it allows your tools to share state.
For example, if you need to connect to a database, you can do it once in the __init__ of the class, and all your tools can use that connection:
1
2
3
4
5
6
7
8
9
10
11
12
13
class AssistantFnc(FunctionContext):
    def __init__(self):
        super().__init__()
        # Share this connection across all tools
        self.db_conn = MyDatabaseConnection()

    @ai_callable(...)
    async def tool_one(self):
        return self.db_conn.query(...)

    @ai_callable(...)
    async def tool_two(self):
        return self.db_conn.query(...)
Summary
- LiveKit does a lot of heavy lifting allowing you to focus more on the business logic.
- LiveKit uses WebRTC by default which helps a lot to have a better user experience.